Deck Panel
Introduction
The Deck Panel is used to structure a presentation at a high level.
This includes:
- Creating and organizing slides.
- Defining resource spans - the slide ranges over which a resource is active.
The Deck Panel is split into three areas:
- Slide Timeline - the horizontal row of slides that make up the presentation.
- Resource Timeline - the area below the slides where resource spans are placed and sized.
- Resource Database Panel - the panel on the bottom used to browse and drag resources into the timeline.
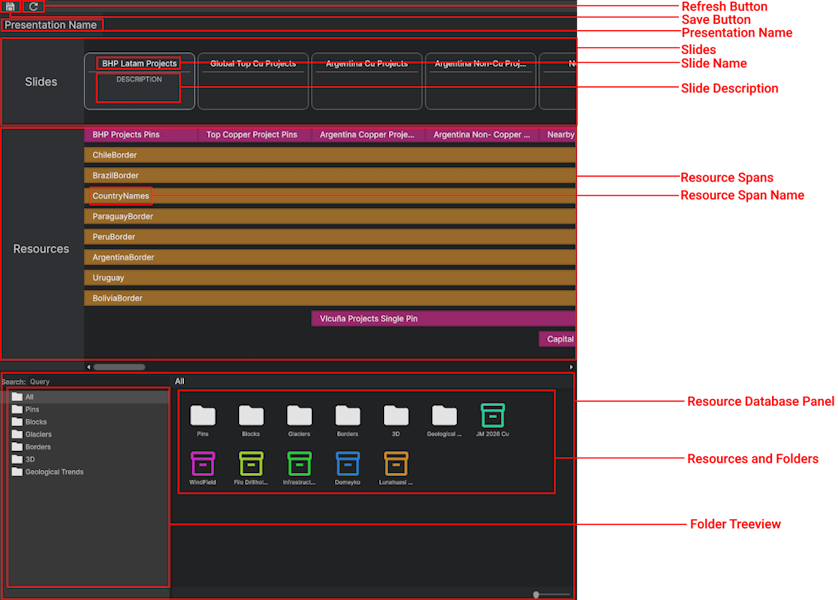
Slides
Slides represent individual steps in the presentation. Each slide has its own timeline, which is authored in the Stage Panel.
See Slides for more detail.
Resource Spans
A resource span defines the range of slides over which a resource is active. It controls when the resource is activated at the start of the span and deactivated at the end.
The timing of the actual activation and deactivation clips - including blend-in and blend-out - is authored in the Stage Panel for the relevant slides.
See Resource Spans for more detail.
Resource Database Panel
The Resource Database Panel is embedded on the bottom side of the Deck Panel. It displays all resources registered in the project's Resource Database.
Use it to browse available resources and drag them into the Resource Timeline to create spans.
See Resource Database Panel for full details on browsing, folders, and customizing resource appearance.
Authoring Flow
A typical Deck Panel session follows this order:
- Add the slides needed for the presentation.
- Rename and reorder slides as needed.
- For each resource that needs to appear in the presentation, drag it from the Resource Database Panel into the Resource Timeline.
- Resize each span to cover the correct slide range.
- Open individual slides in the Stage Panel to author the clip timeline - including activation timing, camera moves, and any other behaviours.